
DIY vs. Professional Floor Coating: Is Saving Money Today Worth the Risk Tomorrow?
- Jan 24
- 5 min read
You've seen the ads. A shiny, showroom-quality garage floor for under $300. Just grab a DIY epoxy garage floor kit from the hardware store, spend a weekend rolling it on, and boom: instant transformation. Sounds pretty tempting, right?
We get it. Who doesn't love a good money-saving project? But before you grab that kit and clear your Saturday schedule, let's have an honest conversation about what you're really signing up for. Because when it comes to floor coatings, saving money today could mean spending a lot more tomorrow.
The Allure of DIY Epoxy Floor Kits
Let's be fair: DIY epoxy kits aren't popular for no reason. They typically cost between $250 and $600 for a standard two-car garage, which is a fraction of what professional installation runs. Plus, there's something satisfying about completing a home improvement project with your own two hands.
These kits usually come with everything you need: the epoxy coating, decorative flakes, and basic instructions. The marketing makes it look simple: clean the floor, apply the product, and enjoy your beautiful new space.
But here's the thing: there's a massive gap between marketing photos and real-world results. And that gap is where most DIY floor coating projects go wrong.
The Hidden Pitfalls of DIY Floor Coating
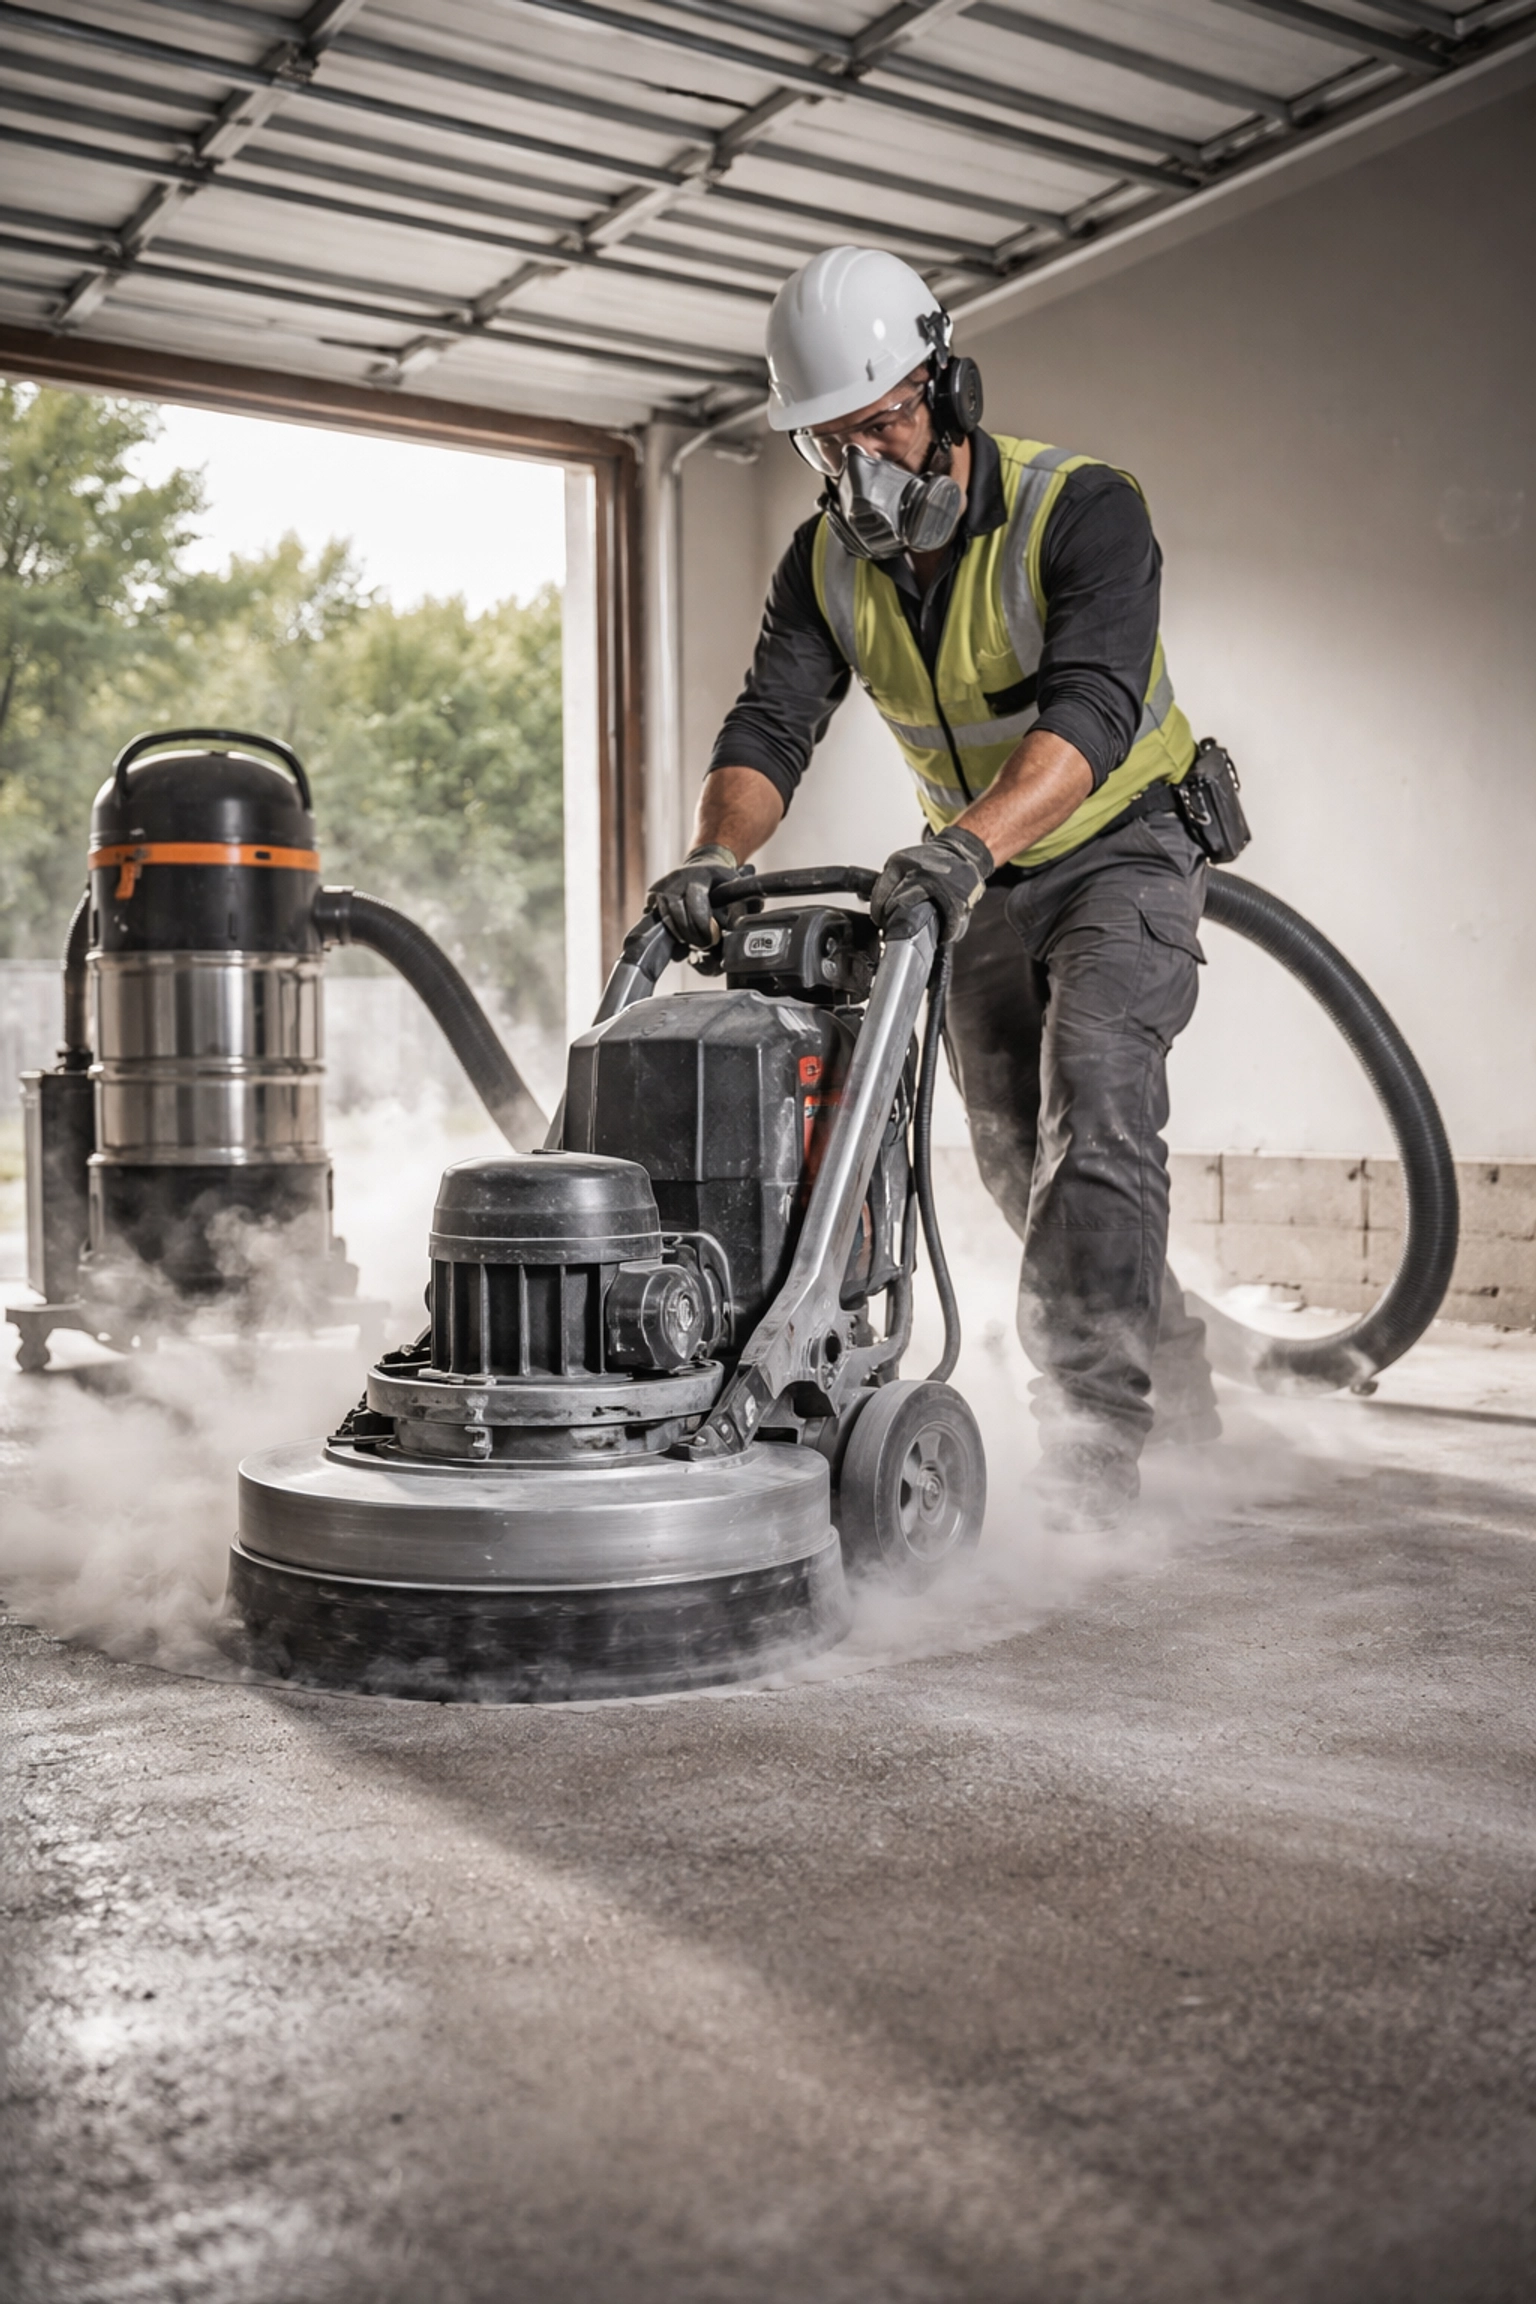
Poor Surface Preparation
This is the number one reason DIY floor coatings fail. Professional concrete coating contractors in Madison MS know that surface prep isn't just important: it's everything.
Most DIY kits recommend cleaning your concrete with a degreaser or acid etching solution. While this might remove surface dirt, it doesn't create the proper profile needed for long-term adhesion. Think of it like trying to stick a Post-it note to a dusty surface versus a clean, textured one.
Professional installers use diamond grinders: industrial-grade equipment that mechanically profiles the concrete surface. This creates thousands of tiny grooves that give the coating something to grip onto. Without this step, you're basically hoping your coating stays put through sheer optimism.
The Moisture Problem Nobody Talks About
Here's something most DIY tutorials skip over: moisture testing. Concrete is porous, and moisture vapor constantly moves through it from the ground below. If there's too much moisture, your beautiful new coating will bubble, peel, and delaminate: sometimes within months.
Professional installers test for moisture levels before any coating goes down. If there's a problem, they install moisture barriers to prevent future issues. Most DIY kits? They don't even mention this potential deal-breaker.
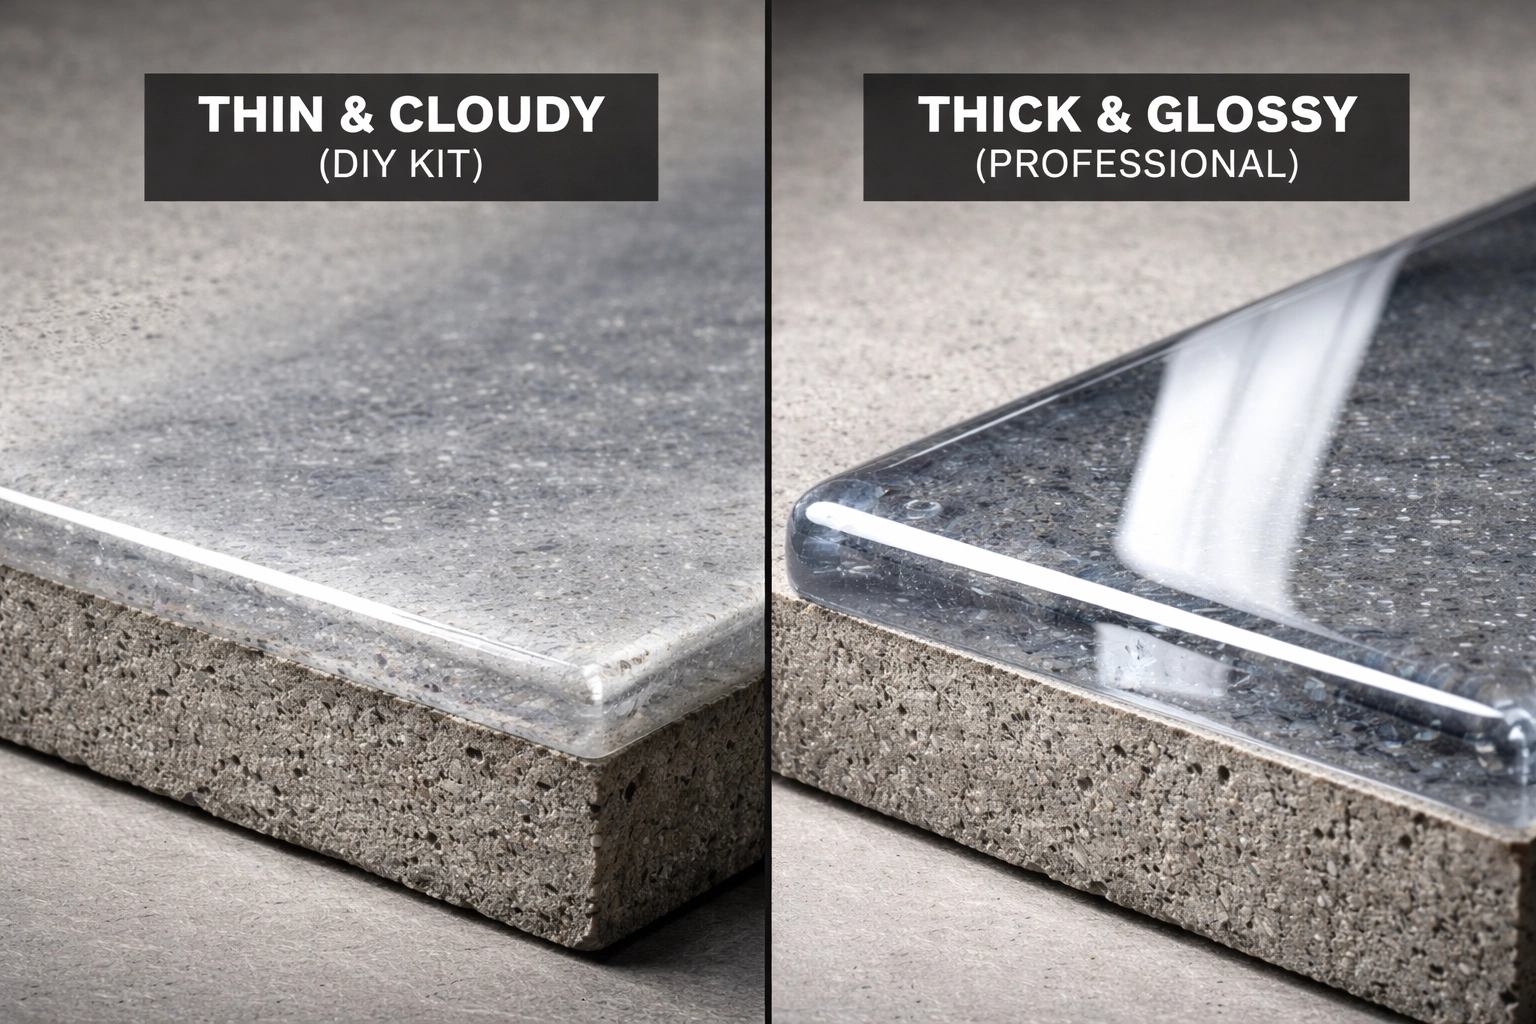
Inferior Products That Won't Last
Not all epoxies are created equal. DIY epoxy kits typically contain around 30% solids, with the rest being water or solvents that evaporate during curing. This leaves you with a thin, relatively weak film on your floor.
Professional-grade epoxy and polyaspartic coatings contain 90-100% solids. That means what goes down stays down: creating a thick, durable surface that can handle real-world abuse. It's the difference between a coat of nail polish and industrial armor.
Bubbling and Peeling: The DIY Nightmare
Search "DIY epoxy floor peeling" online, and you'll find thousands of frustrated homeowners sharing their horror stories. Bubbles appearing overnight. Edges lifting within weeks. Entire sections peeling up after the first winter.
These failures happen because of a perfect storm of issues: inadequate prep, moisture problems, improper mixing ratios, wrong temperatures during application, or simply inferior products doing what inferior products do.
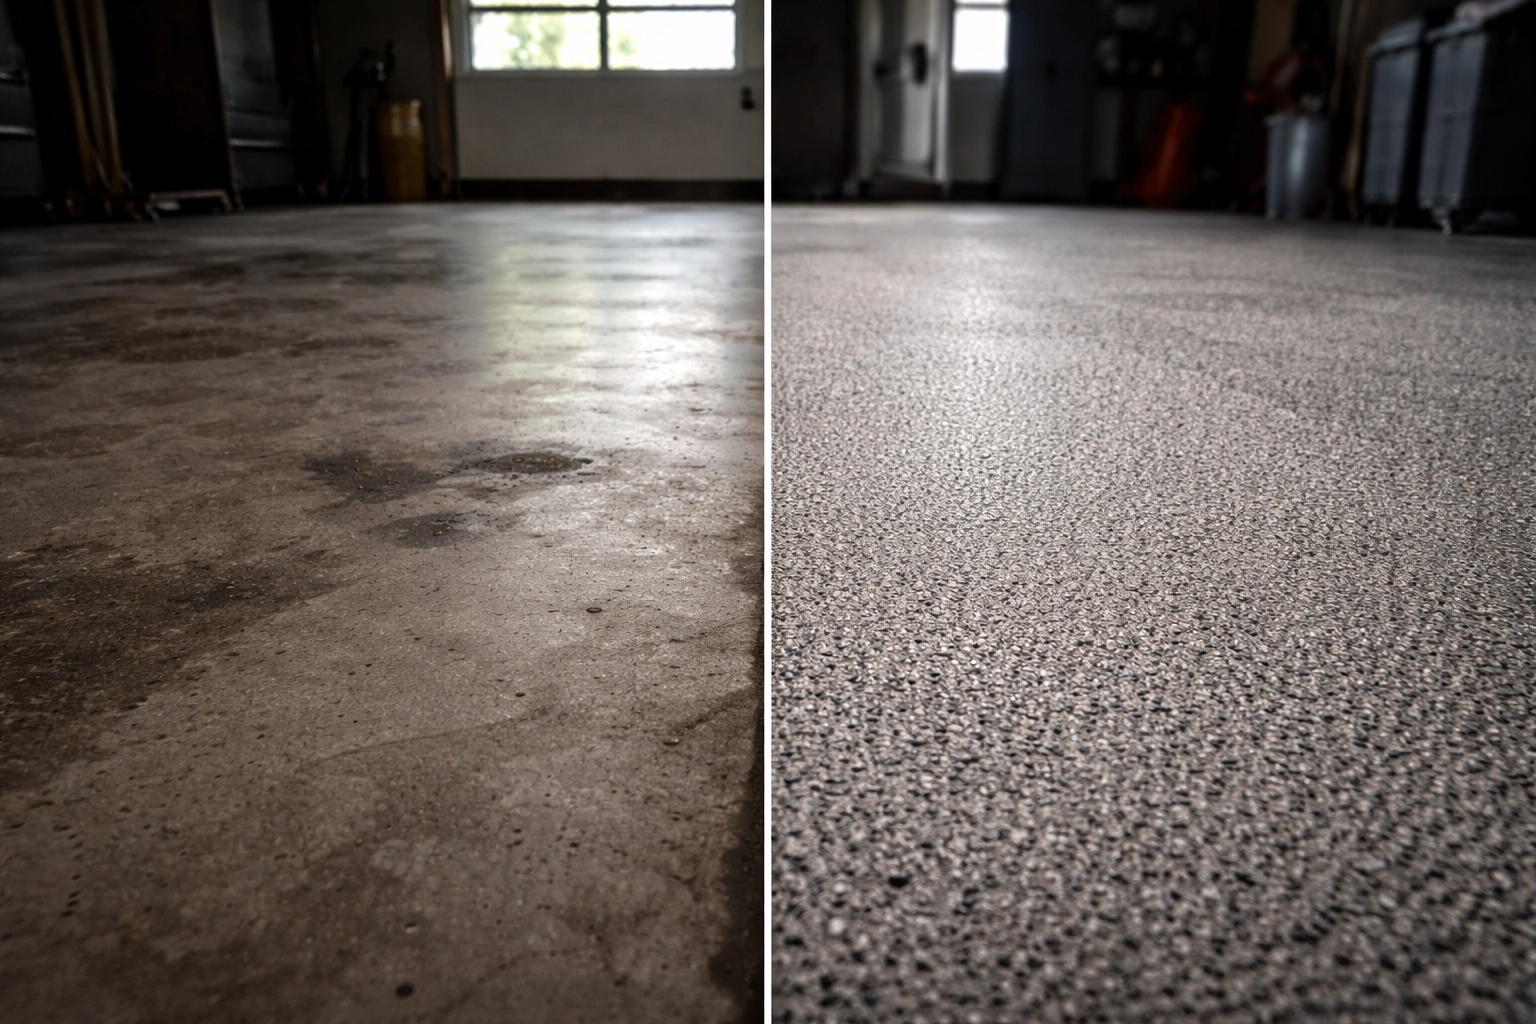
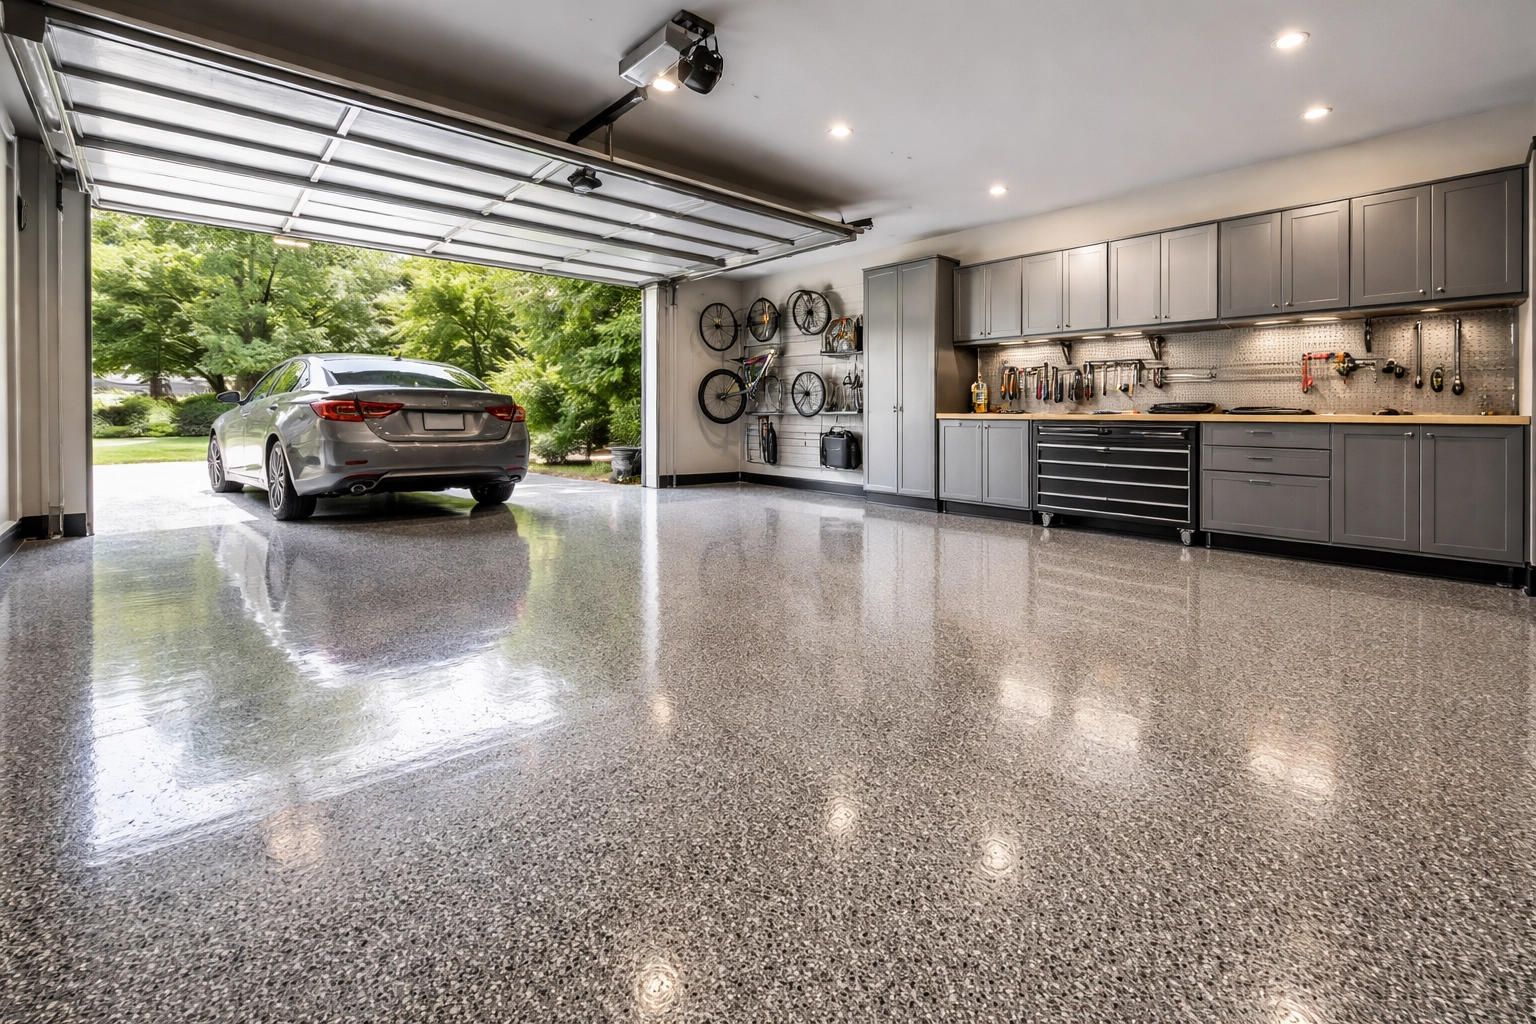
What Professional Floor Coating Actually Delivers
When you invest in professional installation, you're not just paying for someone to roll coating on your floor. You're paying for expertise, equipment, and products that simply aren't available to the average homeowner.
Industrial-Grade Equipment
Diamond grinders, industrial vacuums, and professional spray systems cost thousands of dollars. These tools exist because they're necessary for proper installation: not because professionals enjoy buying expensive equipment.
Superior Products
Professional coatings like polyaspartic and commercial-grade epoxy offer benefits DIY kits can't match:
UV stability that prevents yellowing and fading
Chemical resistance against oil, gasoline, and household chemicals
Faster cure times: often ready for foot traffic in hours, not days
Superior abrasion resistance that handles hot tires and heavy loads
Proper Installation Techniques
Professionals understand that temperature, humidity, and timing all affect the final result. They know how to handle unexpected issues like cracks, oil stains, or uneven concrete. They've seen it all before and know exactly how to handle it.
Warranties That Actually Protect You
When a professional installer stands behind their work with a warranty, you have real recourse if something goes wrong. When your DIY project fails? You're out the money you spent, plus whatever it costs to fix the problem: which often means stripping everything down to bare concrete and starting over.
The Real Cost Comparison: Beyond the Price Tag
Let's talk numbers. A professional floor coating installation typically runs $1,500 to $5,000 depending on size, condition, and coating system selected. That's definitely more than a $300 DIY kit.
But here's what that comparison misses:
Professional coatings last 15+ years. DIY applications frequently need re-coating within 2-5 years. Do the math on buying and applying multiple DIY kits over 15 years, and suddenly professional installation looks like a bargain.
Your time has value. A DIY epoxy project takes most homeowners an entire weekend: and that's if everything goes smoothly. Professional crews typically complete installations in 1-2 days while you go about your life.
Failure is expensive. If your DIY coating fails (and statistically, many do), you'll spend money removing the failed coating, repairing any damage, and either trying again or finally calling in professionals. At that point, you've spent more than professional installation would have cost in the first place.
Epoxy Floor Kit vs Professional Installation: Making the Right Choice
We're not saying DIY is always wrong. If you're coating a small utility space you don't care much about, or if you genuinely enjoy the process and accept that results may vary, DIY can be a reasonable choice.
But for spaces that matter: your garage, your basement, your business: professional floor coating benefits far outweigh the upfront savings of going DIY. You get:
Durability that handles real life
Aesthetics that actually match the showroom photos
Peace of mind knowing the job was done right
Warranty protection if anything goes wrong
Ready to Do It Right the First Time?
At Madison Coatings Company, we've seen plenty of DIY coating jobs that looked great for a few months before everything went sideways. We've also helped countless homeowners transform those failed projects into floors they're genuinely proud of.
If you're considering a floor coating project in the Madison, MS area, we'd love to show you what professional installation can achieve. Check out our gallery to see real results from real customers, or contact us for a free consultation.
Your floor is going to be with you for a long time. It's worth doing right from the start.