
How to Detect Moisture in Concrete Basement Floors
Table of Contents
Why Concrete Basement Floors Trap Moisture: Causes of Moisture in Basement Floors
Water Vapor Migration and One-Sided Drying
Distinguishing Slab Moisture from Leaks and Condensation
How to Prepare a Concrete Slab for Moisture Testing
Plastic Sheet Test for Concrete Moisture: The Simple Screening Method
Using a Concrete Moisture Meter: Pin-Type vs Non-Invasive Meters
ASTM F1869 Calcium Chloride Test and ASTM F2170 In-Situ RH Testing
ASTM F1869: Calcium Chloride (MVER)
ASTM F2170: In-Situ Relative Humidity
Which Test Should You Choose? A Simple Decision Tree
Test Limitations and Safety
Concrete Moisture Testing Before Floor Coating: Matching Results to Flooring Thresholds
What to Do Next: Interpreting Results and Choosing the Right Fix
Step 1: Identify the Source Before You Treat the Symptom
Step 2: Read Your Result Against the Right Number
Step 3: Match the Fix to the Cause
Step 4: Know When to Retest and When to Call a Pro
Frequently Asked Questions
Last Updated: October 8, 2026
Why Concrete Basement Floors Trap Moisture: Causes of Moisture in Basement Floors
Knowing how to detect moisture in concrete basement floors starts with why they stay damp: concrete dries from one side only, water vapor rises from the soil, moves through the slab, and has nowhere to go once flooring covers the top.
At Madison Coatings Company, we inspect slabs across Madison County, and the story repeats: a floor that looks dry can still release water vapor from underneath.
Three sources matter most:
Water vapor migration through the slab from damp soil
Water intrusion from leaks, poor drainage, or a failed vapor barrier
Condensation when warm, humid air meets a cool slab surface
Knowing which one you have changes the fix.
Water Vapor Migration and One-Sided Drying
Water vapor migration is the upward movement of moisture from soil through a concrete slab. Concrete is porous, pulling groundwater up by capillary action, and because the slab only dries from the top, moisture collects near the surface.
A slab dries at roughly one inch per month, so a four-inch slab can take months to release construction moisture. If the vapor barrier is missing or damaged, soil moisture keeps feeding the slab for years.
Distinguishing Slab Moisture from Leaks and Condensation
Not every damp floor is a slab moisture problem. A few quick checks separate the three causes:
Leaks and water intrusion leave stains, damp patches near walls, or efflorescence (white mineral powder)
Condensation shows up as beads of water on a cool slab during humid weather and wipes away easily
Slab moisture is invisible, comes from below, and returns after you dry the top
Wet only in one corner near a downspout means water intrusion. Damp everywhere on a muggy day suggests condensation. Dry to the touch but flooring keeps failing means the slab is likely releasing vapor from below.
How to Prepare a Concrete Slab for Moisture Testing
Clean, bare concrete gives accurate readings. Any coating, sealer, or dust traps moisture and skews the result.
How we prep a slab before testing:
Clear the area of boxes, mats, and stored items.
Sweep or vacuum all dust and debris from the test spot.
Remove any paint, sealer, or old adhesive. A concrete moisture meter won't read through them accurately.
Let the slab sit at normal room conditions for at least 48 hours.
Keep the space at its normal temperature and humidity. Do not run a dehumidifier right before testing.
Pick test spots that reflect the whole floor: near walls, in the center, and in any low spot where water pools.
Pro Tip Test the wettest-looking area first, not the driest. If the worst spot passes, the rest of the slab usually will too.
Plastic Sheet Test for Concrete Moisture: The Simple Screening Method
The plastic sheet test is the fastest, cheapest way to learn how to detect moisture in concrete basement floors.
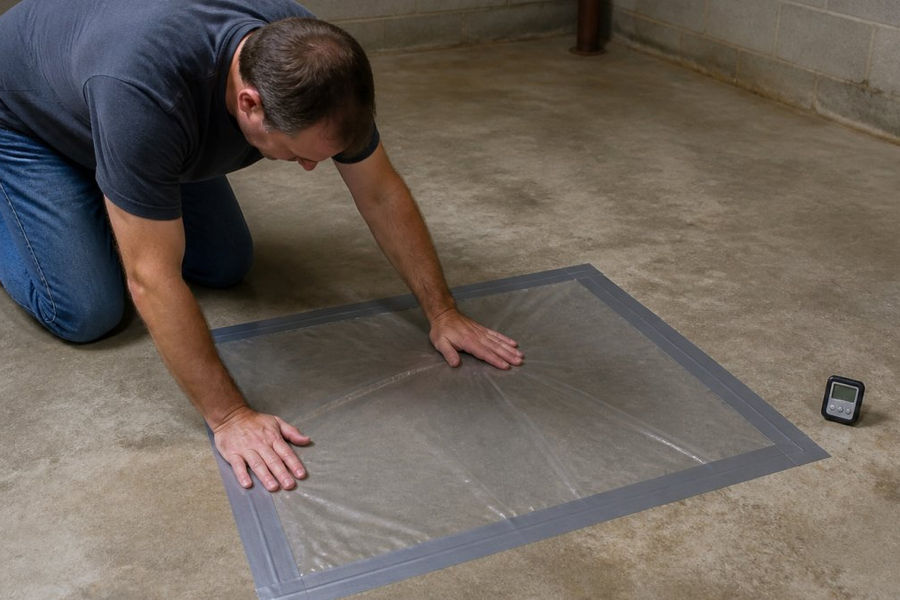
The test uses a taped square of polyethylene sheet:
Cut a 12-inch by 12-inch square of clear polyethylene sheet (6 mil thick).
Tape all four edges to the bare slab with duct tape to seal it.
Leave it in place for 16 to 24 hours.
Pull the sheet back and look for two things: water droplets on the underside, and a dark damp patch on the concrete.
The foil test works the same way with aluminum foil. Both show whether vapor is moving up through the slab.
The catch most guides skip: the plastic sheet test only tells you moisture is present, not how much. It cannot confirm a slab will pass or fail a flooring manufacturer's limit.
Watch Out Do not install flooring based on a plastic sheet test alone. It can show "dry" on a cool day and hide a slab that releases far too much vapor once the seasons change.
Using a Concrete Moisture Meter: Pin-Type vs Non-Invasive Meters
A concrete moisture meter gives a fast reading, but the two main types work very differently. A pin-type meter drives two probes into the slab and reads electrical resistance between them.
Metropolitan Floors
Meter Type | How It Works | Best For | Main Limitation |
Pin-type | Probes measure resistance inside the slab | Spot checks at depth | Leaves small holes |
Non-invasive | Surface sensor reads capacitance | Quick scanning of large areas | Only reads the top layer |
Pin-type meters reach internal moisture better; non-invasive meters are faster but can miss moisture deeper in the slab.
A common mistake is trusting one reading in one spot. Moisture varies across a slab. Take readings in several places and compare.
ASTM F1869 Calcium Chloride Test and ASTM F2170 In-Situ RH Testing
Two standardized tests give numbers you can act on: the calcium chloride test and the in-situ relative humidity test. Flooring manufacturers rely on these when a warranty is on the line, but they measure different things, and picking the wrong one wastes time and money.
ASTM F1869: Calcium Chloride (MVER)
The calcium chloride test (ASTM F1869) measures the moisture vapor emission rate, or MVER, in pounds of water per 1,000 square feet over 24 hours (F1869 Standard Test Method for Measuring Moisture Vapor Emission Rate of Concrete...).
What it tells you: how much vapor is escaping the top of the slab right now, under that dome, at that temperature and humidity.
What it does not tell you: how much moisture is still inside the slab, or what will happen when the seasons change.
ASTM F2170: In-Situ Relative Humidity
The in-situ relative humidity test (ASTM F2170) measures the percent relative humidity inside the slab.
What it tells you: the moisture state of the slab itself, which changes slowly and predicts long-term behavior better than a surface emission reading.
What it does not tell you: the emission rate a flooring adhesive will actually see at the bond line.
The ASTM standard for measuring moisture vapor emission sets the method for the calcium chloride test. The ASTM in-situ relative humidity standard covers the RH probe method.
Which Test Should You Choose? A Simple Decision Tree
The choice usually comes down to what you are trying to decide:
You just want to know if there is a problem worth investigating. Start with a plastic sheet test or a moisture meter. If it shows nothing, you are usually done. If it shows moisture, move to a standardized test.
You are installing a floor covering and the manufacturer requires a number. Use the test the manufacturer names in its written installation instructions. Many flooring makers accept either ASTM F1869 or ASTM F2170, but some specify one. Follow the spec, not your preference.
The slab is thick, on grade, or over a known high-moisture soil. In-situ RH testing (ASTM F2170) is generally the more reliable choice because it reads moisture inside the slab rather than only what escapes the top.
Watch Out A plastic sheet test, a foil test, or a handheld meter reading is a screening method. None of them is a substitute for ASTM F1869 or ASTM F2170 when a flooring manufacturer, a warranty, or a building code official is asking for a number. Test Limitations and Safety Both standardized tests have limits worth knowing before you drill or pay for lab work: Calcium chloride is sensitive to site conditions. Room temperature and humidity during the 60-72 hour window affect the result. A test run in an unconditioned basement in July reads differently than the same slab in January. In-situ RH requires drilling. You are putting a hole 40 percent of the way through a structural slab. On a post-tensioned slab, a slab with embedded conduit, or a slab with radiant heat tubing, drilling blind can sever a tendon, a wire, or a pipe. Have the slab scanned or the drawings reviewed before you drill. Both tests are point-in-time. A slab that passes in spring can fail in late summer. If your installation is months away, retest closer to the install date. If you are not sure which test your project needs, check the flooring or coating manufacturer's written requirements first, then match the test to that requirement. Concrete Moisture Testing Before Floor Coating: Matching Results to Flooring Thresholds Every flooring product has a moisture limit, and every limit is different. Epoxy and polyaspartic coatings, luxury vinyl plank, tile, and carpet all tolerate different amounts of slab moisture. The part that trips people up: there is no single "safe" number for all floors. A slab that passes for one product can fail for another. For coatings, the slab must be dry enough for the coating to bond. If moisture keeps pushing up after installation, the coating can blister, peel, or bubble. The test result matters less than the match. A reading is only useful when you compare it to the specific flooring or coating manufacturer's limit.
If you plan to coat a garage or basement floor in Madison, testing first protects your investment. Skipping it is how DIY coatings fail within months.
What to Do Next: Interpreting Results and Choosing the Right Fix
A test result only means something once you know what caused it. Before you buy a mitigation coating or call a contractor, spend ten minutes separating the four things that make a basement floor wet. They look similar and get fixed very differently.
Step 1: Identify the Source Before You Treat the Symptom
What you see | Most likely source | Quick confirmation |
Beads of water on a cool slab during humid weather, wipes away easily | Condensation from indoor humidity | Dry the spot, watch it. If it returns only on muggy days and wipes clean, it is condensation. |
Damp patch in one corner, near a downspout, or below a window | Water intrusion from outside | Check exterior grading, downspout discharge, and the floor-wall joint. |
White mineral powder (efflorescence) or a tide line on the wall | Wall seepage or chronic water entry | Look for staining that follows the wall, not the floor. |
Floor looks dry but flooring keeps failing, adhesive lifts, coating blisters | Slab vapor migration | A plastic sheet test or meter reading shows moisture with no visible water source. |
Wet spot that never dries, even in dry weather | Plumbing leak or drain backup | Shut off fixtures one at a time and watch the spot. |
If moisture comes through the wall or floor-wall joint, no slab coating will fix it. That is a water-entry problem, and it needs to be solved outside or at the wall before any floor work begins.
Step 2: Read Your Result Against the Right Number
There is no universal "safe" moisture number for concrete. Every flooring and coating product has its own limit, set by the manufacturer, not by a single industry-wide figure.
Result below the manufacturer's limit: the slab is ready. Prep the surface per the product instructions and install.
Result at or above the limit: you need a moisture mitigation plan before any floor covering goes down. Do not install and hope.
Result is borderline: retest closer to the install date. Slabs move with the seasons, and a borderline reading in a dry month can fail in a wet one.
The test result matters less than the match. A reading is only useful when you compare it to the specific flooring or coating manufacturer's written limit for the product you plan to install.
Step 3: Match the Fix to the Cause
Once you know the source and the number, the fix usually falls into one of these paths:
High vapor reading, no water entry: apply a moisture-mitigation coating or epoxy vapor barrier rated for the reading you measured. These products are not all equal, check the manufacturer's rated MVER or RH limit against your test result.
Water intrusion at the wall or floor-wall joint: fix exterior grading so soil slopes away from the foundation, extend downspouts well away from the house, and repair any failed vapor barrier or drainage. Interior sealers alone rarely solve this.
Condensation from indoor humidity: a dehumidifier sized for the space, plus better air movement, usually solves it. In a Madison, Mississippi basement, summer humidity is high enough that a dehumidifier is often a permanent fixture, not a temporary fix.
Step 4: Know When to Retest and When to Call a Pro
Retest if:
The first test was borderline against the manufacturer's limit
More than 30 days have passed since the test and the install date is still ahead
The season has changed significantly since the test
Call a professional if:
You see efflorescence, a tide line, or staining that follows the wall
The floor is wet in one area and dry everywhere else
A sump pump runs constantly or the pit refills quickly after rain
A clear decision tree keeps it simple: screen with a plastic sheet or meter, identify the source, measure with a standardized test if a number is required, compare to the flooring manufacturer's limit, then fix the cause before you install.
If you would rather hand the whole job to a crew, Madison Coatings Company handles moisture testing and floor coating together.
Frequently Asked Questions
How do you check moisture in a concrete basement floor?
Start with a plastic sheet test: tape a 2-foot by 2-foot polyethylene sheet to the slab with duct tape and leave it for 16 to 24 hours. Condensation under the sheet or a darkened slab signals moisture migration. For a measured result, use a concrete moisture meter or a calcium chloride test. If you plan to install flooring or a coating, ASTM F1869 or ASTM F2170 testing gives the numbers your installer needs.
Can a pin-type moisture meter measure moisture in concrete?
Pin-type meters work as a quick screening tool, but readings shift with surface temperature and humidity. For a reliable number before floor coating, use an in-situ relative humidity test per ASTM F2170, which places sensors at 40 percent of the slab depth. Pair meter readings with a calcium chloride test or RH test for a complete picture.
Does the plastic-sheet test reliably detect moisture in concrete?
The plastic-sheet test is a screening method, not a measurement. It shows whether water vapor is moving through the slab under current conditions, but it does not produce an MVER or percent relative humidity value. Results vary with room temperature, humidity, and slab temperature. Use it to decide whether deeper testing is needed, then confirm with ASTM F1869 or ASTM F2170 before installing flooring or a coating.
Should concrete moisture be tested before installing a floor coating?
Yes. Coatings, adhesives, and most floor coverings trap moisture in the slab. If the moisture vapor emission rate or relative humidity is too high, the coating can blister, peel, or fail within months. Test before any coating or flooring installation, and compare results to the manufacturer's limits. If readings are high, address drainage, vapor barriers, or surface preparation first, then retest before applying the coating.
A damp basement floor is a problem you can solve, but only if you know what you are dealing with. Test the slab, match the result to your flooring, and fix the source before you coat. If you are searching for moisture testing and concrete coating near me in the Madison, Mississippi area, our team can assess your slab and recommend the right coating. Get started with Madison Coatings Company and protect your concrete with a floor that lasts.
Get Started Today